Раздел: Документация
0 1 2 Troubleshooting Display errors in transaction data Display errors may include garbage text, drop caps, and malfunction in printing. 1. If the printer used by your POS system/cash register is not supported by Epson, select General in the POS Module field. Refer to the System Configuration section. 2. Make sure your POS system/cash register and GV-system are using the same language in their respective operation systems. If none of the above solution solves your problem, send us the following information. We will analyze your case and offer you a possible solution. • The txt file created by HyperTerminal. For more information about HyperTerminal, see the documentation: The Printing Mode of POS System/Cash Register (http: www.geovision.com.tw/002/en/faq/pos/pdf/The printing mode of POS system cash register.pdf) • One copy of the transaction receipt. Refer to Figure 2 on page 11. • A desired file name that will be used as POS Module name. Refer to Figure 3 on page 12. • The POS system/cash register type and model. • The printer type and model. Transaction events did not stop properly This problem happens when GV-system cannot identify specific commands from your POS system/cash register. To solve this problem: 1. Download the program TranStopEdit.exe from the link http: geo-support.dipmap.com:100/POS/TranStopEdit.exe to the system folder. 2. Execute the program to display the following TranStopEdit window. 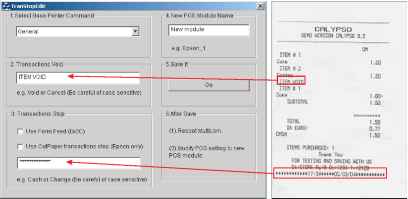 Figure 1 The TranStopEdit window Figure 2 Receipt copy 3. Under Select Base Printer Command, select the printer command used by your POS system/cash register. 4. Under Transactions Void, enter the exact transaction text used to identify "void". In this example, we find the exact text is ITEM VOID. 5. Under Transactions Stop, enter the stop command used by your printer. If your printer does not support the Form Feed or CutPaper command, enter the exact transaction text used to identify "stop". In this example, **********17:34***05/03/04********** indicates the transaction stops. However, since the time and date varies with each transaction, only enter ********** as the stop command. 6. Under New POS Module Name, enter a module name for the new settings. 7. Click Go to apply all settings. 8. Run POS Server Setup. (Look under GV-System/Configure/POS Application Setting/POS Device Setup) 9. Click the New button in the POS Server Setup window. 10. In the POS Module drop-down list, select the POS module you created in TranStopEdit. 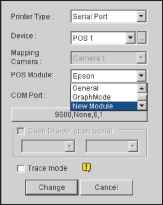 Figure 3 Selecting the created POS module 11. Click Add, and test this setting. Connecting more than 2 POS systems/cash registers Normally, one PC comes with 2 COM ports so that only 2 POS systems/cash registers may be supported without COM port extension. Now the extension is possible by using GV-Hub. One GV-Hub can connect up to 4 GV-Data Capture boxes, as illustrated below. 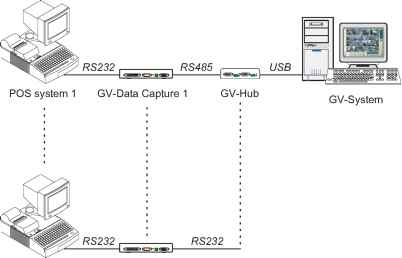 POS system 4 GV-Data Capture 4 The displayed transaction item did not match that entered at the POS system/cash register 1. Run POS Server Setup. (Look under GV-System/Configure/POS Application Setting/POS Device Setup) 2. Click the New button in the POS Server Setup window. 3. Select Epson in the POS Module field. 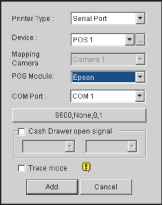 Figure 6 Selecting Epson in the POS Module field 4. Click Add, and test this setting If the above setting doesnt work, send us the following information. We will analyze your case and offer you a possible solution. • The txt file created by HyperTerminal. For more information about HyperTerminal, see the documentation: The Printing Mode of POS System/Cash Register. (http: www.geovision.com.tw/002/en/faq/pos/pdf/The printing mode of POS system cash register.pdf) • One copy of the transaction receipt. Refer to Figure 2 on page 11. • A desired file name that will be used as POS Module name. Refer to Figure 3 on page 12. • The POS system/cash register type and model. • The printer type and model.
0 1 2
|
||||||||||||||||||||||||||||||||||||||||