Раздел: Документация
0 ... 10 11 12 13 14 15 16 ... 19 Deleting Preset Data Sometimes it is necessary to delete the stored data. All the data can be cleared from a dome by pressing key [ЖЭШШ, followed by the CLRlkey. * All 128 preset data will be erased. Pushl9r0riT1l, followed bylCTLR key. HS SEE ЕЕ1Ш° j F3 j j F4 j Jl 2 j j 3 j j SETUP ]□ j 9 I CAM j ENT j j PRESET PIH-800II ICS EHH HE ПИШПИПИШ] Дщщ HE о И[ЕЗ НИН EEE ЕЕ оНЯННН ЕЕрД НЕ езеэнин I I I шес PIH-801 Alarm Management The 6 alarm inputs of each fast dome are corresponding with the first 6 preset positions. When an alarm signal is triggered, the dome will go to the relevant position at 360 /sec. Make sure the first 6 preset positions are set to desired alarm areas. Alarm input can be set to NC (normally close) or NO (normally open) depends on alarm detector. Please refer to page 7 for alarm switch setting. Relationship Between Alarm Inputs and First 6 Presets
Alarm Response Mode The fast dome alarm response can be set to Lock or Release mode. Lock : dome remains at last alarmed preset point Release : dome moves between alarmed points then reverts to prior status, such as autopan. ft Lock Mode When an alarm is triggered, the dome will go to the relevant position at 360/sec and the keyboard will audio alert the user until it is canceled manually. To manually cancel the alarm trigger: Push ALARM RESET key. Ifmore than one alarm is triggered, the fast dome will lock on the last alarm triggered position. 3 Release Mode • Under Auto Pan Condition When an alarm is triggered under Auto Pan, fast dome will go to the relevant position at 360/sec. After 60 seconds the alarm will be canceled automatically and back to Auto Pan mode. If more than one alarm is triggered, the fast dome will moves between alarmed points every 5 seconds and back to Auto Pan mode after 60 seconds. • Not Under Auto Pan Condition When an alarm is triggered not under Auto Pan, the fast dome will go to the relevant position at 360/sec. After 60 seconds the alarm will be canceled automatically, and dome will be back to first preset position. If more than one alarm is triggered, the fast dome will move between alarmed points every 5 seconds and back to first preset position after 60 seconds. • The audio alert for alarm trigger will remain on until it is manually canceled by push the ALARM RESET key. Alarm Output Each fast dome has 1 alarm output, with three contacts: Common, NC (normally close) and NO (normally open) to activate linking devices. • When alarm response mode is set to LOCK Mode: When the alarm is triggered, NC contact to Common will be open and NO contact to common will be close. Alarm output will be back to the condition before alarm, 10 seconds after the last alarm is triggered. • When alarm response mode is set to RELEASE mode: When the alarm is triggered, NC contact to Common will be open and NO contact to common will be close. Alarm output will be back to the condition before alarm, 60 seconds after the last alarm is triggered. 25X Fast Dome Function Setup PIH-7625 (25X Optical Lens) series provide on-screen setup menu, all functions can be selected and set via OSD Setup Menu. j Recall Setup Menu Push CTRL 1 key to recall OSD menu. MENU SETUP PAGE 1 1. INITIAL SET 2. AGC 3. SENS. UP 4. BLC 5. BLC REGION 6. FLICKERLESS 7.WB MODE 8. WB Continue :OFF : MEDIUM :OFF :OFF : CENTER :OFF :ATW : AUTO MENUSETUPPAGE2 9. GAMMA 10. PEDESTAL 11. VHAPSL 12.VAPSL 13. HAPGL 14.HAPGH 15.VAPG 16.VHAPG  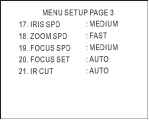 1. Factory Default Setting 2. Auto Gain Control Selection 3. Sensitivity Enhancement ON/OFF 4. Back Light Compensation ON/OFF 5. Back Light Compensation Zone Selection 6. Flickerless ON/OFF 7. White Balance Mode Selection 8. White Balance Condition Display 9. GAMMA (Brightness) Adjustment 10. Pedestal Adjustment 11. Horizontal & Vertical Aperture Correction Slice Level Adjustment 12. Vertical Aperture Correction Slice Level Adjustment 13. Horizontal Aperture Correction (Low Band) Gain Level Adjustment 14. Horizontal Aperture Correction (High Band) Gain Level Adjustment 15. Vertical Aperture Correction Gain Control Adjustment 16. Horizontal & Vertical Aperture Correction Gain Adjustment 17. Manual Iris Speed Selection (Refer to Page33) 18. Manual Zoom Speed Selection (Refer to Page 29) 19. Manual Focus Speed Selection (Refer to Page 32) 20. Auto Focus Mode Selection (Refer to Page 31) 21. IR Cut Switch I2 Setup Menu Item Selection ) Push the joystick down to select next item. ) Pushthejoystickupto select previous item. ) Push the joystick left or right to make selection. SETUP INITIALIZE...... 3 To Exit Setup Menu Push хТюНт key, "Setup Initialize..." message will be displayed on the monitor for 4~5 seconds. All setting is stored in Fast Dome. 0 ... 10 11 12 13 14 15 16 ... 19
|